Access to the System
Access to the system realizes through entering individual IP Address and Port number of the device to the Web Browser.
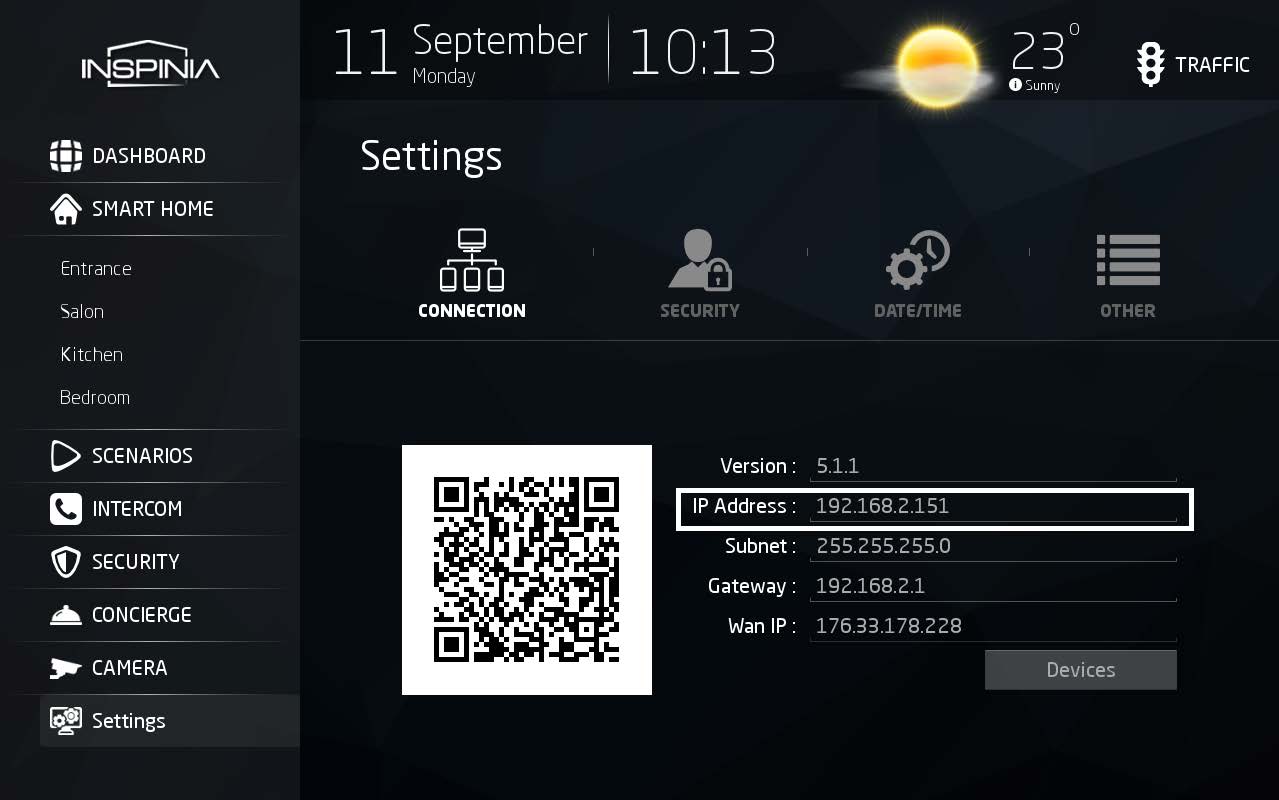
First check the IP Address of the device, from Touchscreen go to “Settings/Connection”.
After, open your Web browser and Enter the IP Address and Port number
In order to reach this page, you need to make sure that your PC/MAC or your mobile device is connected to the same network as INSPINIA.
Types of the Access:
- Local access: IP address and port number of device inside local network is required.
- Remote access: You will need to redirect Local IP Address of the panel to the Public IP Address.
| Username | Password | Description |
|---|---|---|
| user | user | Intended for end-user can monitor and control. |
| admin | 51GX19MH | Intended for integrators, has unlimited authorization to Settings |
In our case we will use admin account for managing configuration of the system.
Web Interface
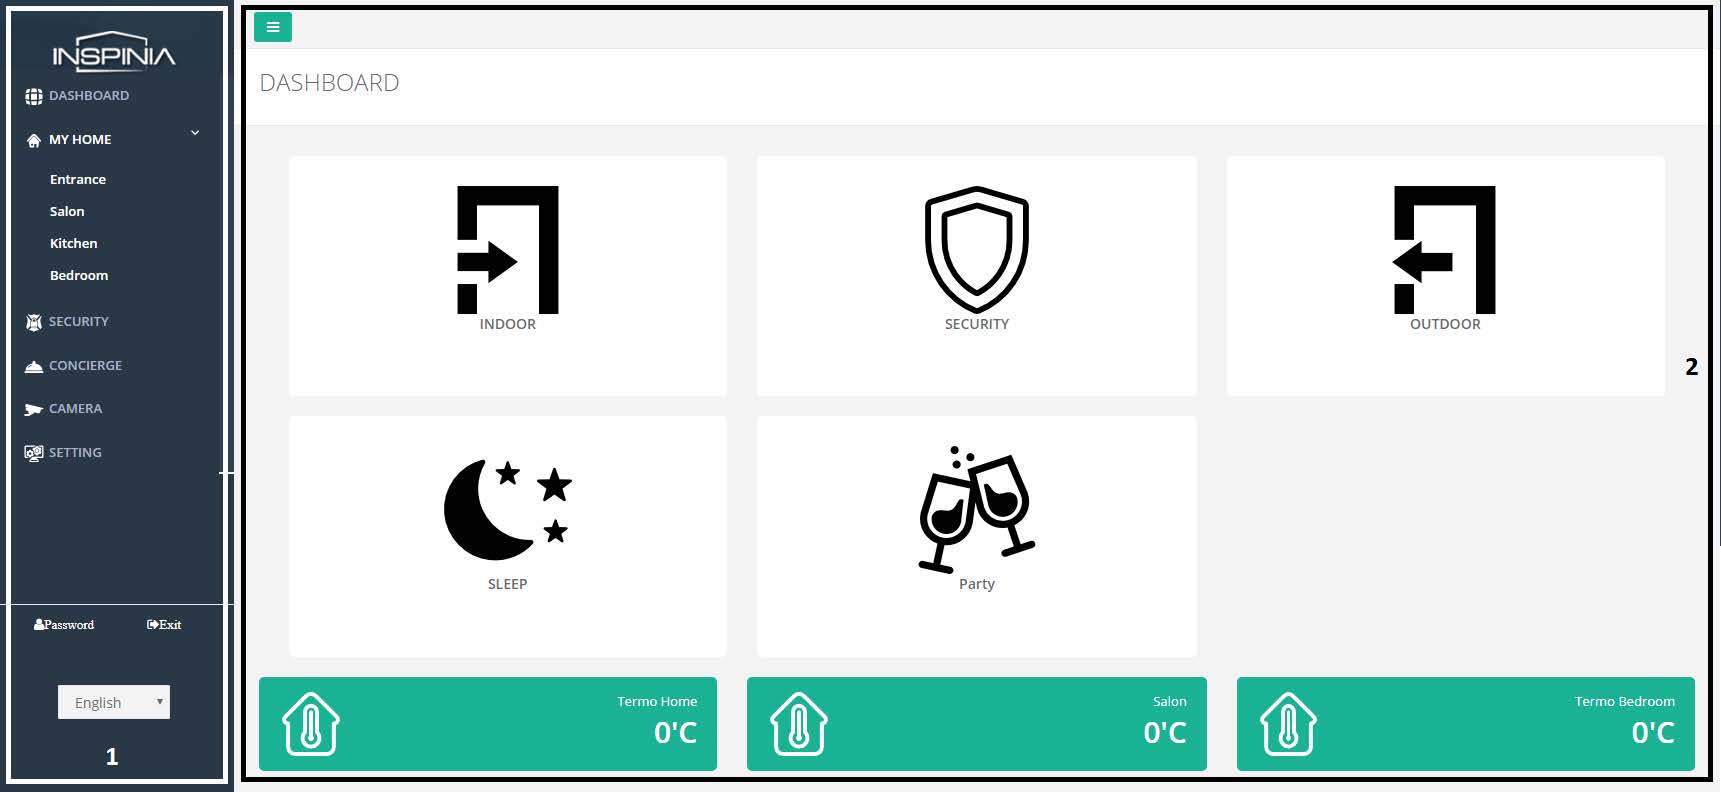
Menu Bar consist of all menu options.
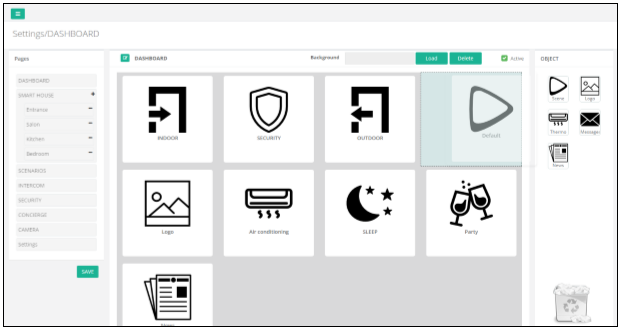
Dashboard: View of Dashboard from Web interface.
Settings
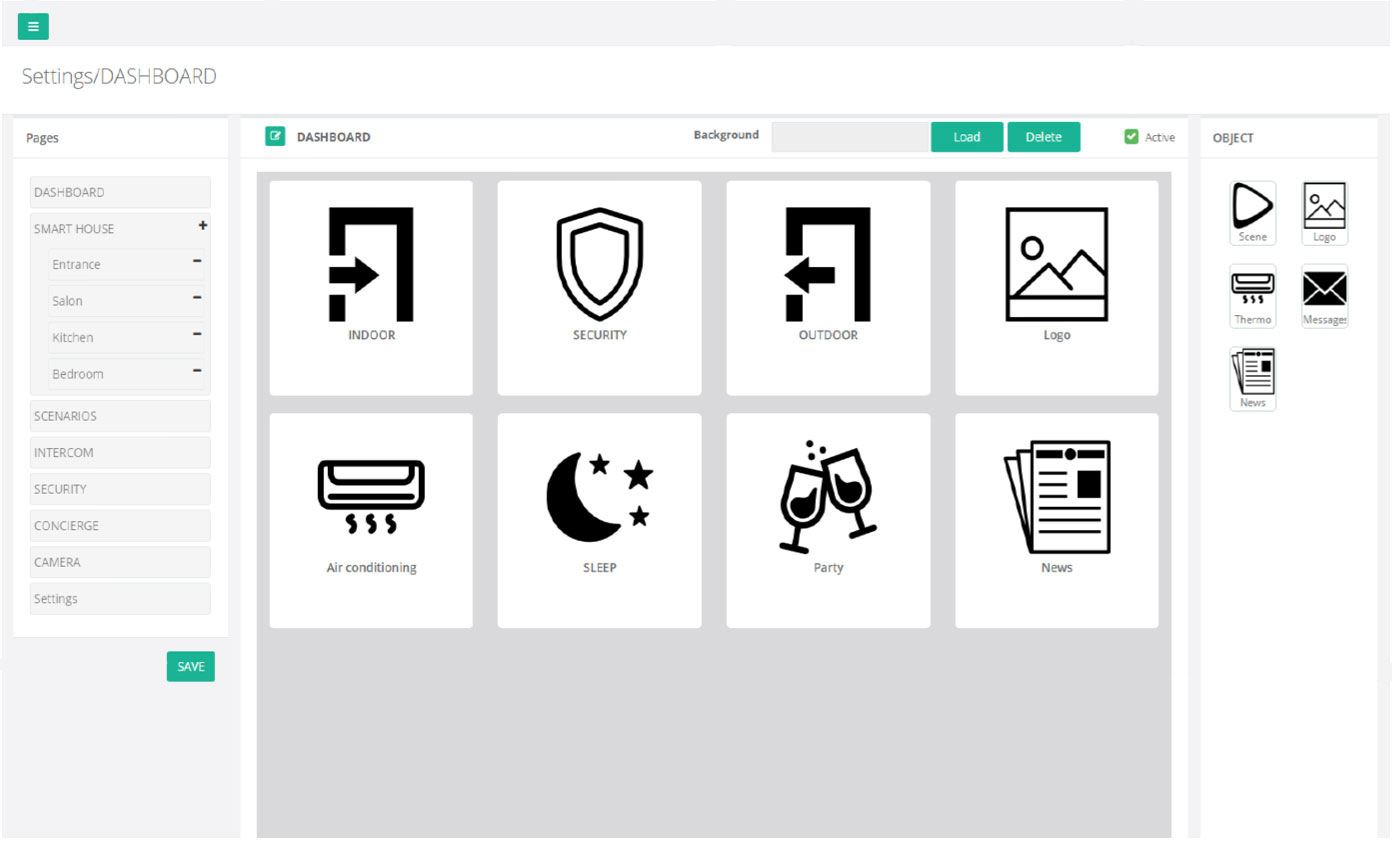
Minimize Menu
Edit page name
Attach background to the page
Visibility of page on Touch Panel
Object bar
Save configuration
Field for controllers
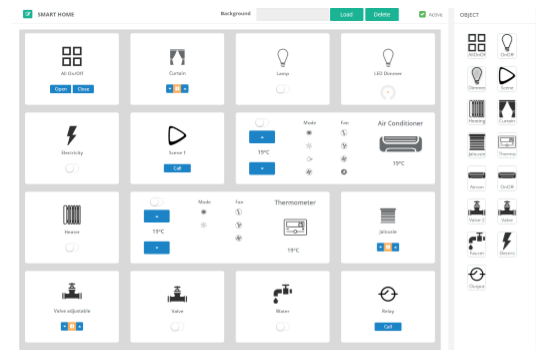
- Adding Controllers fulfills through picking “Object” from bar and dropping it to the controllers field.
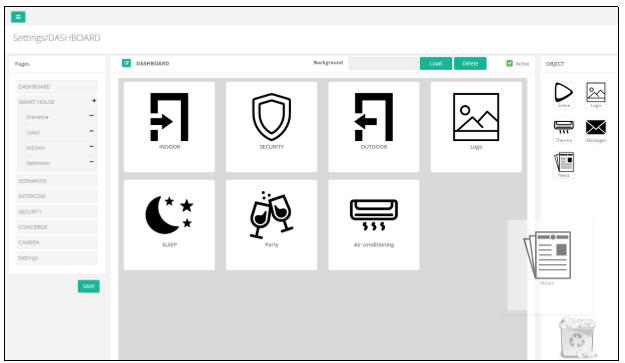
• If you want to Delete any Controller from Dashboard just pick an object and bring it to the right corner of the window.
Object Bar
 Shortcuts:
Adding Shortcuts provides short ways to your favorite Scene by one click.

Name: Gives name to Shortcut
Image: Catalog of the icons for Shortcut
Scene Type: Can be set as Local Scene, Bus Line or both Scene & Bus
Scene: Choose scene from Scenarios
Group Address: Enter the group address of KNX/SCS project
Try to choose most common Icon to your Shortcut from catalog.


 •Dashboard Logo
Uploads picture on the dashboard. The format of the picture should be as follows.
Max. Size = 5MB, Resolution =320×400 pixels or square of them.

 •Ambient Temperature
Temperature from all thermometer and air conditioners will show up on the dashboard.

 • News
Renders list of News headlines, which will inform you with a latest news from several newspapers with a set update time.

 • Message
Receives massages and announcement from concierge or security of the buildings. Following service mostly depends on the Administration of the building. (Additional Smart Console device required)

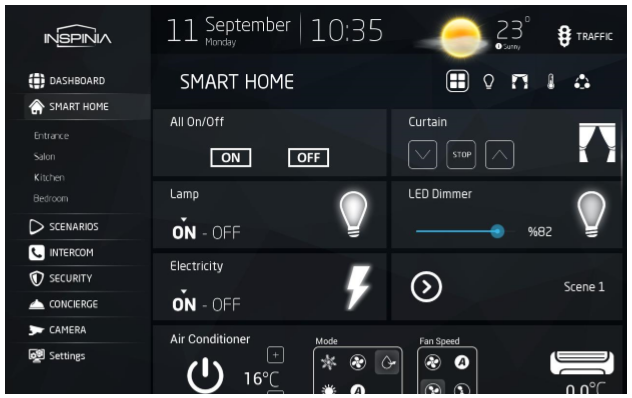
Smart Home
• Consist of controllers, scenarios which provides control and management of all part of your house.
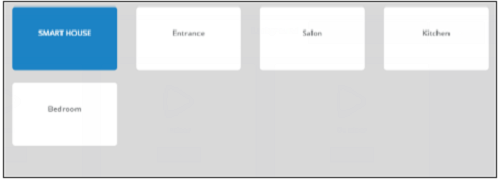
• Also, by creating other separate rooms, controllers and scenarios can be add to them for more comfortable conditions.
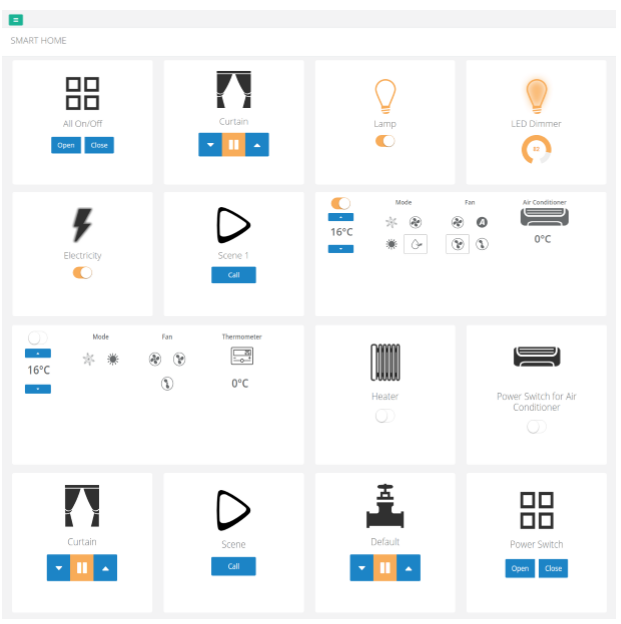
• The Icons of the Objects represents the intended purpose of the controllers in a graphical way and changes depending on the current state of the controllers (On/Off/Open/Close).
• In the case of Curtain, Jalousie or Valve motors used as actuator, for that three buttons are available (Move Up, Move Down and Stop).
• For the Air Conditioners or Thermometers extra following buttons available (Mode, Fan Speed, Temperature scale).
Smart Home Settings
• From the settings of the Smart Home you can Add, Delete or Edit controllers and scenarios.
Adding Controllers
 • All On/Off
Group On/Off controller.
Following “Group Address” for KNX and “Integer Address” for Bticino should be entered.
 •On/Off
On/Off controller for Illumination purposes
 • Dimmer
Controller for DALI gateway which is capable of dimming function so brightness of the illuminator can be regulated.
 • Scene
Controller allows to call Scenarios from Bus line or Scenarios from panel.
Types of Scene: Bus/Scenarios/Bus & Scenarios
 • Heater
Controller specified for heating systems such as: Heaters, Heating batteries…
 • Curtain & Jalousie
Controller for Curtain & Jalousie
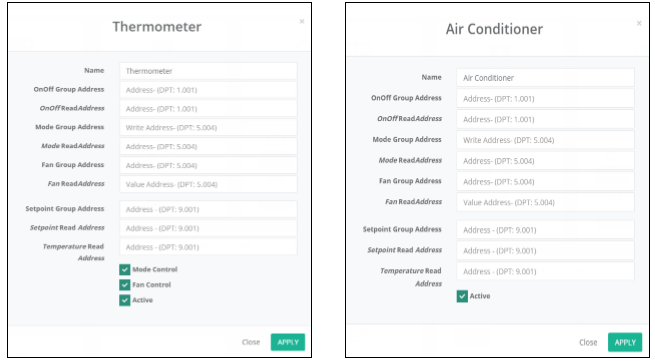
•Thermometer & Air conditioner
Controller intended for air conditioners and thermometers.
Provides functions such as Fan Speed, Mode and Temperature set.
Power switch: On/Off button.
Button Up/Down: Set the temperature.
Mode: Mode control.
Fan: Fan speed control.
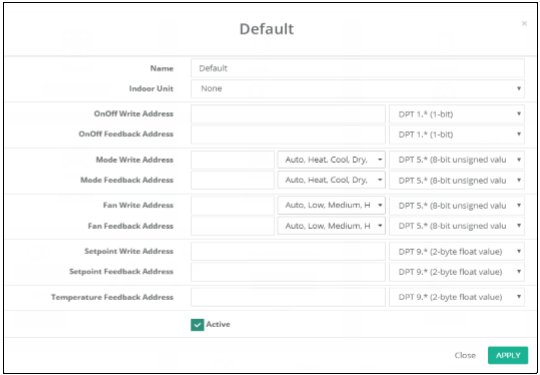
• If you choose VFACE or VMODE from settings. Additional line will show up for selecting indoor units from VRF system.
• Following addresses should be checked from KNX project and in a proper way should be fulfilled in appropriate fields.
Mode Control: Allows to control Mode of AC from touch panel.
Fan Control: Allows to control Fan speed of AC from touch panel.
Active: Visibility of controller on Touch Panel
•KNX Thermo
This controller defined for all types of KNX thermostat. With this controller it is possible to change the DPT type of group address, also you can set the value which you what to send.
 • Valve
Controller for Valve actuators.
 • Adjustable Valve
Controller for Valves which have adjustability features.
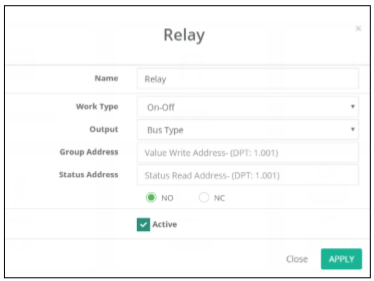
 • Relay
Dry contact (24Vdc 2A). Can be used for several purposes as an example for calling elevator to your floor.
Name: Edit name
Work Type: Choose the function of the controller: On-Off or Pulse
Output: Bus Type or Digital output
Digital OUT: Choose Digital Output which are available on rear side of Touch panel.
Bus Type: Need to fulfill associated addresses
• Below you can choose the state of the Relay as Normally Closed or Normally Open. As initial condition of actuator.
• External Relay
Depending on the project additional Relay modules can be added to the Ports and can be used as External Relay 1,2.
 • On/Off air conditioner
On/Off controller for air conditioners.
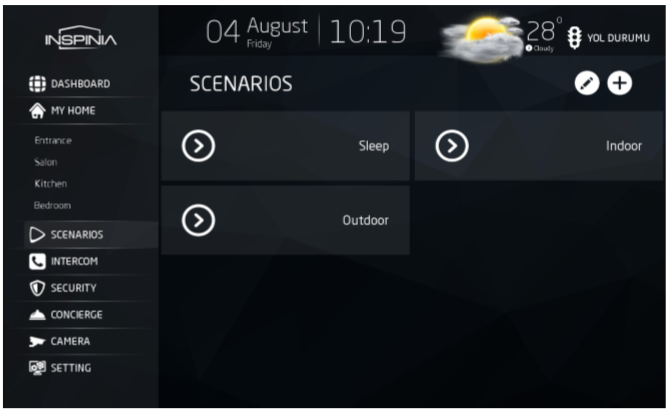
Scenarios
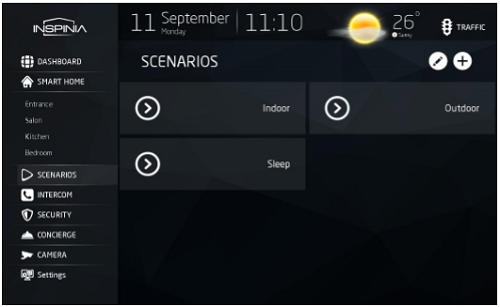
• Customizable scenarios can be created by integrator or end-user. Various actions can be defined such as KNX control, also can be set as schedule which will be triggered automatically.
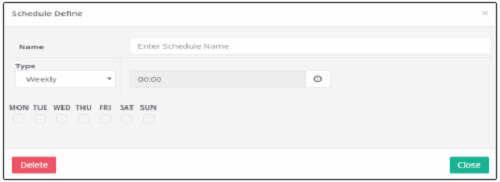
• With scenario, it’s possible to define initial state of controllers, set alarm status and create single-time or weekly schedules to run.
• Indoor: means you are Home so water, electricity, gas, lights in corridor are turned ON.
• Outdoor: means you are going out so it’s turning OFF all devices except the devices which needs electricity all the time (refrigerator).
• Sleep: this mode is before going to bed, light can be dimmed so slight luminance will be in rooms and can control also temperature in the rooms.
• For more information about creating scenarios from INSPINIA video tutorials are available in our web page.
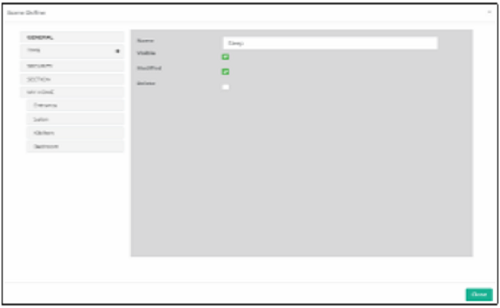
Scenarios Settings
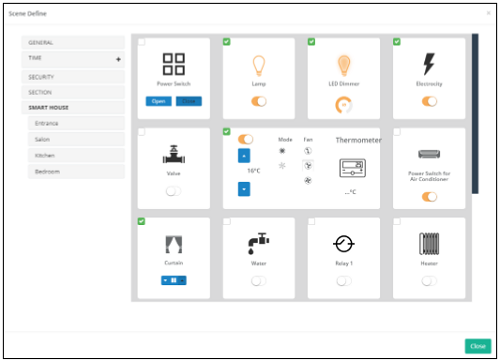
• General: Edit Name, Visibility on Touch panel, allow end-user to Modify, Delete the Scene.
• Time: Can set the scheduler for Scene by defending day and time.
• Security: You can activate several types of actuators, security objects while Scene apply.
• Section: Please choose in which part or rooms of you house want to see this Scene.
• Smart Home: Firstly, select controller by putting tick after choose state of controller.
• Following functions are also available from INSPINIA.
• Edit: You can make a change in existing Scenes.
• Add: New Scenes can be added.
• Proceeding same steps, you can configure the Scene from INSPINIA which is also available in video tutorials on ……
Intercom
• Intercom is inevitable and most important part of any Smart Buildings. Now with INSPINIA by using VOIP it easy to establish.
• Each INSPINIA will take its own individual IP address and name during configuration.
• No need for SIP Server, system will automatically search and define all possible clients inside the network.
• For apartment intercom solutions following brands (Akuvox, Bticino, Dahua, 2N) can be supported without any additional setting.
• For other types of outdoor devices additional settings may be required.
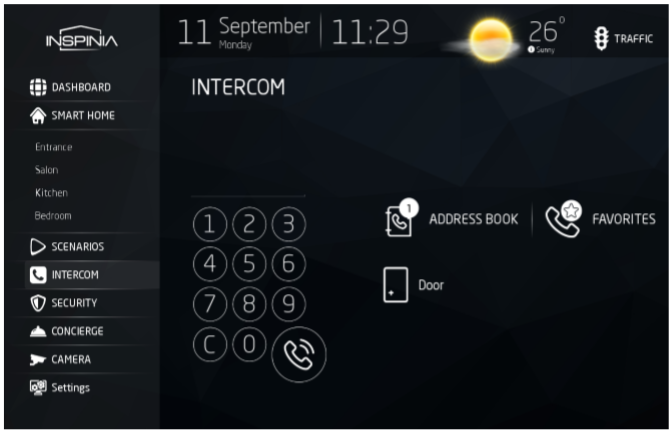
Address Book: Provides all visible contact which you have inside residence.
Favorites: Provides favorite contacts which can be added from address book.
Door: Switch for opening doors.
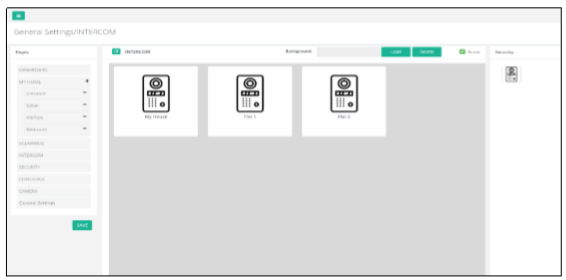
Intercom Settings
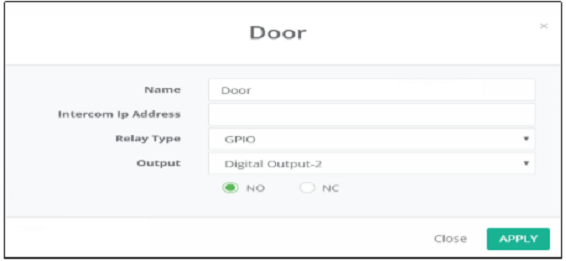
• Intercom IP Address: IP Address of Digital Call Entrance Panel (Outdoor Intercom Module).
• Relay type: As the door UNLOCK option following type can be selected:
GPIO: Choose external output INSPINIA

Bus line: Enter Bus Address

IP Module: Enter IP Address

AKUVOX : Enter username and password which can be defined from Akuvox web configuration

Call forwarding: All income call to the INSPINIA Panel can be forwarded to your mobile device
Security
Following section is responsible for Security of building or house. These becomes possible by mounting specified Sensor and Alarm. Here are some examples
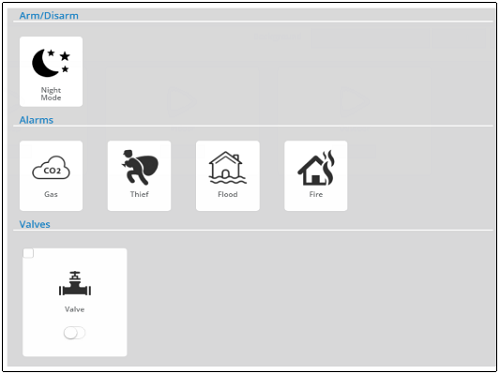
• Gas Alarm: specific sensor will be set up, while detecting any gas leakage it will give alarm, will turn OFF valve and will inform related employment.
• Motion Alarm: while nobody at home motion sensor will be activated, if any movement detected it will turn alarm ON and informs you.
• Flood Alarm: in a same manner list of alarm can be settled by specific sensor and during any income signals it will inform client.

Objects which have 24 inside the circle will trigger directly Burglar alarm without providing deactivate time.
• Set an Alarm: From INSPINIA coming to “Security” section Choose Alarm type.

Default password: 1234
By entering the password, you will be able to activate or deactivate alarm.
Security Settings
There are two types of Alarms which can be set from INSPINIA or Mobile Application:
 • Burglar

Arming Duration: Is the time delay before alarm is activated.
Disarm Duration: Is the time delay before alarm is deactivated.
Alarm Installation Type: Auto setup / Setup by password.
Sensor: Choose the sensor for Input signal. It can be added from security object bar.
Output: As a response to the Burglar choose which type of action you want to apply.
 • Night Mode

Arming Duration: Is the time delay before alarm is activated.
Disarm Duration: Is the time delay before alarm is deactivated.
Alarm Installation Type: Auto setup / Setup by password.
Sensor: Choose the sensor for Input signal. It can be added from security object bar.
Output: As a response to the Burglar choose which type of action you want to apply.
Four Alarms below can’t be set, they will stay always Active. During any detection, these alarms will trigger desired Output actuator. Can be assumed as sensors.
 • GAS Alarm

Input Type: Digital Input / Bus.
Digital IN: Digital Input / KNX Address
• As a response to the Gas alarm it will turn ON Siren and will close Gas valve
 • Motion Alarm

Input Type: Digital Input / Bus.
Digital IN: Digital Input / KNX Address
24h Zone: Putting tick will provide to trigger directly Burglar alarm without providing deactivate time.
 • Fire Alarm

Input Type: Digital Input / Bus.
Digital IN: Digital Input / KNX Address
• As a response to the Fire Alarm you can select controllers from Siren and Valve
 • Flood Alarm

Input Type: Digital Input / Bus
Digital IN: Digital Input / KNX Address
• As a response to the Flood Alarm you can select controllers from Siren and Valve
 • Doorbell
This controller is for Doorbell.

Bell Sound: Catalog of doorbell rings.
Input Type: Define source of input signal.
Digital IN / Address: Set the Input or KNX address.
Rtsp URL: For the Camera, real time stream.
Rtsp Timeout: Duration of real time stream from Door.
 • Siren
Adding Siren for Emergence situation. After adding Siren, it will be available as Outputs in all Alarms.

Alarm Output: Digital Output / Bus Type
Digital OUT: Define the output external Pin from INSPINIA
 • Valve
Controller for the valve actuator. After adding Valve, it will be available in all Alarms.

 • Started
Every time when the system will stand by or in the case of Power Surge, sends signal/pulse to the Bus Line.

 • Output
In the case of activating/deactivating Alarm, sends signal/pulse through Bus line or Digital output.
Concierge
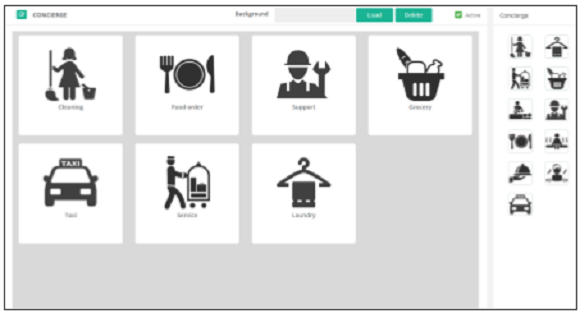
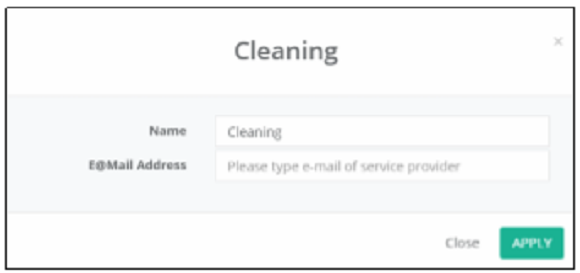
This section is mostly depending on administration of building, hotel or residence. Administration will define the types of services which can be exhibit. After specified services will be add to Concierge section.

Getting benefit from services is simple, push the available service and set the detail of the service.

Concierge Settings
Choose most common Object to your service after fulfill contact information.
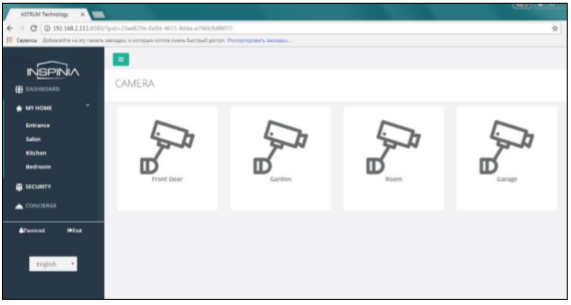
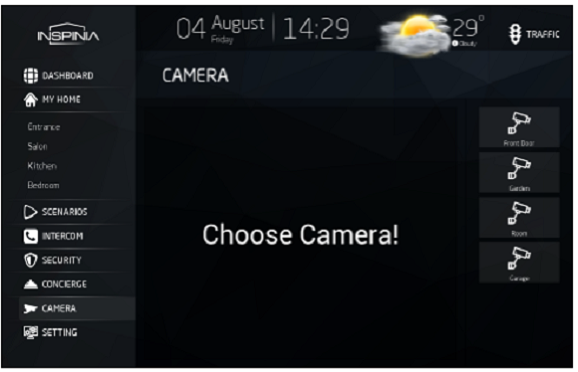
Camera
This section displays video streams of compatible IP cameras which is mounted around building. The video streams can be accessed within the local network or by remote access through mobile application.
Camera Settings
If you want to enable live stream on your mobile app, you need to redirected Cameras Local IP addresses to static IP address using port forwarding.
Name: Edit name
Http URL: Enter URL address
Public port: Please enter public port number which you used in forwarding.
Mobile: Available on mobile app
Rtsp URL: Enter Rtsp URL of camera which can be defined through search button.
• As Camera solutions, we are supporting ONVIF standard and H264 protocol.
Defining camera: Push “Rtsp URL”, choose Camera depend on resolution.

If you are unable to find cameras from searching please enter Rtsp URL manually. Check tutorial on web page
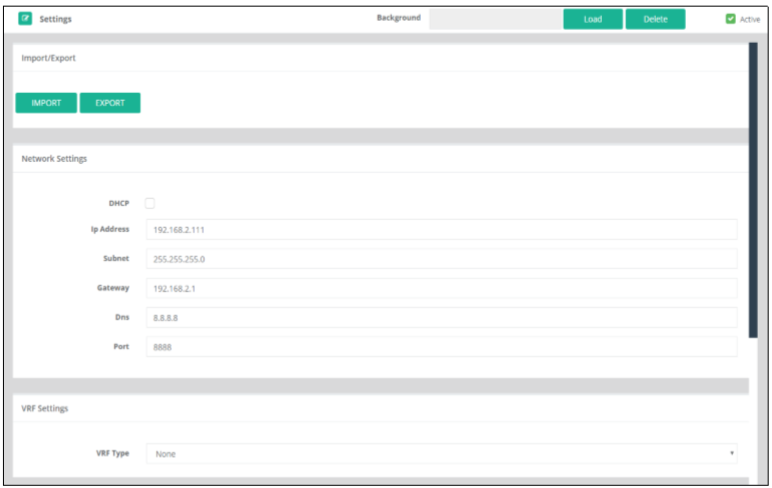
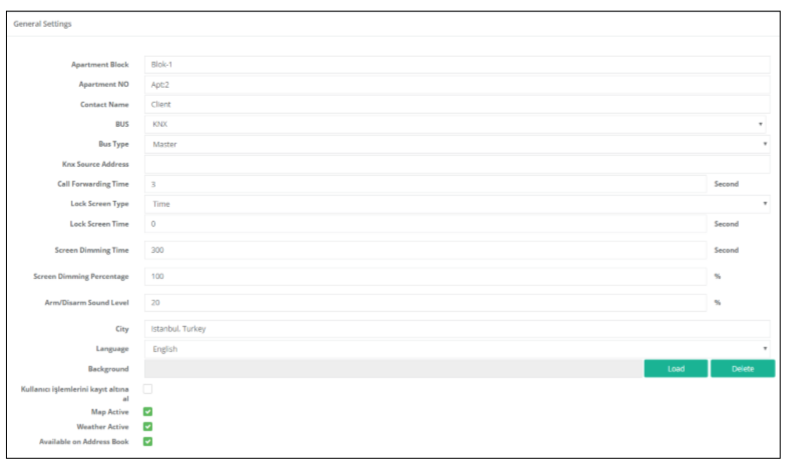
General Settings
Import/Export: Exports following Settings or Imports the existing Setting(.json).
Network Settings: It can be set through DHCP or Manually
• Be attentively with network setting, during defining IP address don’t mix them and fill all the lines
• Port: Required to enter port number, which need to be defined while redirecting local IP address to the Public IP address for the remote control.
VRF Settings: VFACE / VMOD
• VMODE: Extra VRF Add-on module required, module is unique for each type of brands you need to mention it while ordering. After plugging and selecting the brand click to the search button. Video tutorial is available on ….
• VFACE: If you have VFACE product already mounted to your apartment please enter the IP Address of system and refresh page as a result you’ll see the list of all Indoor units. System will automatically search and finds all Indoor units.
Apartment Block: Enter building name/number.
Apartment NO: Enter flat number.
Contact Name: Enter resident information.
BUS: Select default Bus line: KNX / Bticino / NIO.
KNX Source Address: Define KNX group address for panel. Default source address: 1/1/111
Call Forwarding Time: Set the delay before forwarding income call of panel to your mobile phone
Lock Screen Type: Select screensaver type: Password / Time / Logo.
Lock Screen Time: Time before locking screen.
Screen Dimming Time: Time before dimming brightness of screen
City: Located city
Language: English, Türkçe, Pусский, Deutsch
Background: Changes background of the Dashboard
User Action Log: You can enable or disable user actions on panel.
Map Active: Visibility of TRAFFIC feature on Information Bar
Weather Active: Visibility of Weather feature on Information Bar
Available on Address book: Visibility of Panel on Address Book
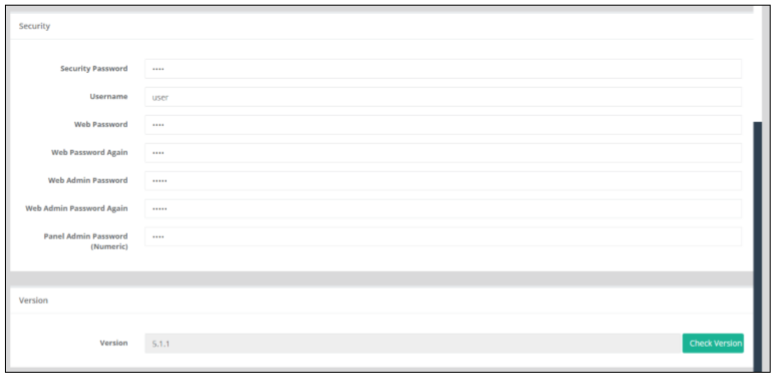
Security Password: Code of Security menu in INSPINIA
Username: Client username (Don’t use space while the naming)
Web Password: Client password
Web Password Again: Enter again Client password
Web Admin Password: Code for Web Admin (Operator)
Web Admin Password Again: Enter again Code for Web Admin (Operator)
Panel Admin Password (Numeric): Administrator password of INSPINIA (Default: 3010)
Version: Views software version. Can be updated if its available

